Brush Techniques can be easy, if you realise that they are the slaves of your heart!

I want to paint like a force of nature, like the wind that sweeps across the land.
But painting is not a fight! A brush technique should be easy to handle.
Anger is the enemy of ease.
But don’t be afraid to make mistakes. Mistakes are basically a good investment when you realize what you did wrong. Behavior changes very slowly. You will become a good painter step by step because motor skills develop more slowly than comprehension.
To become a good painter, you need four things: a wild heart, fine eye, a crazy but light hand and a brush with a fine tip. Everything else is bells and whistles. Tine
Hello to usk India and warm welcome from Switzerland.
Compared to India, Switzerland is tiny. This is my home Basel and I love it!

I welcome you here from one of the largest cities in Switzerland, Basel. We have 171,000 inhabitants. What is considered a big city here, is probably a smaller district in your city. Because your city is so big, that it makes up half of the citizens of our entire country.
What India and Switzerland have in common, is that we are a melting pot. Our small country combines the knowledge of many nations. We are a country of immigration, and we are in the middle of Europe.
The result is:
We are small, but smart.
And now I am very happy to send the knowledge from a very small country to you in India.
I am almost embarrassed to give a lecture on watercolor in India.
Because India has such a great tradition in painting and also in watercolor.
Watercolor techniques are different to Urban Sketching brush techniques?
But is it really? We always think so because the watercolors we know are often very elaborate. Images that are created in hours of work, in studios.
This is the reason, why we think watercolor is much too complicated for Urban Sketching.
But what if we knew brush techniques that make it easy and fast?
These simple and refined brush techniques are the content of this lecture.
This workshop is not only about what you can do with the brush, but also as well about tricks which make the brush work easier.
Brush techniques, simple is best for me.
Nothing is worth more than the loving feelings you can give to another person. I want to paint with joy and with emotional involvement. But exactly when I am in this mood, I make a lot of mistakes.
This created some anger in me, because I was not able to paint objects the way I felt the motif. However, if I painted very correctly and controlled, the momentum was gone.
The advantage of emotional painting is that you touch the viewer.
All I needed were brush techniques that were so simple that I could use them even while painting with my heart.

I allow myself mistakes that happen always in a fast and emotionally sketch. Have you noticed that the left person is missing legs? No? That’s good! Because I think the emotional painting is much more important than the error-free.
Simple urban sketching brush techniques :
„The Person who stops learning is old, if the person is 20 or 80. …. Tine Klein
Often, it’s enough to change a little something about a classic watercolor technique to make it much easier.
This slight change in the brushwork or the structure of the image design can help watercolor to be as fast as the pencil sketch which is very simple coloring.
1. Brushes – my philosophy:
Especially when you are painting on the street, you do not want to have 1000 things with you. I failed because my brush did not do what I wanted! Gradually, I saw that brushes have somewhat different requirements for urban sketching than for watercolor in the artist’s studio.
I asked myself: Why are my brushes failing? Is there the one brush that can do everything?
Watercolor brushes are often designed for very wet techniques. In Urban Sketching, however, you want to work very quickly. The very wet brushes were not suitable for what I wanted to do.
Natural Hair Brushes flooding the paper in small Formats, and the results are very long drying times and blossoms of water.
I said goodbye to expensive watercolor brushes and at the same time I said goodbye to the water tank brushes that are supposed to be so perfect for urban sketching.
My philosophy was:
Less is more! I wanted only one or two brushes that do everything I want for me.
And this brush should be suitable for spontaneous painting, large glazes and at the same time it should create elegant lines.
I prefer for Urban Sketsching very large synthetic brushes, but at the same time I like my brushes with a very precise tip.
The large brush body ensures that the brush works like a water tank. At the same time, the synthetic hair ensures that the brush tip is stable und does not soak up too much water.
The control of the water is the key to be a brilliant watercolorist.
The control of the water is the base of all brush techniques. Water tank brushes constantly release water, which is why I do not like brushes with a water tank. They keep the painter stupid, because they do not let the painter control the water.
If you never learn to control the water in a brush, you can’t put the majority of brush techniques on paper with ease.
If you have learn to control the water, then you can put 95% of an image on paper with ease and speed.
So knowledge is the basis of happiness in painting.
Brush techniques – ways to handle Watercolor:
Watercolor cannot be corrected, it is the technique of masters!
You read this sentence in almost every book! The sentence is so wonderful, because the authors of the books can praise themselves so perfectly with it. Nevertheless, the sentence is totally stupid.
Either I’m hallucinating, or a whole bunch of watercolor authors have taken lots of drugs.
Watercolors are wonderful to correct, because they are water soluble. So don’t be afraid of watercolor.
Brush techniques for lifting watercolor:
The easiest thing, of course, is to remove the paint when it is still wet.
All you need is a slightly damp brush, or sponge. If the paint is still wet, then the brush will soak up the paint and the problem is solved.
The catch to the technique is that you can’t keep working when the paint starts to dry, because that’s when ugly stains appear.
Most often, the paint was not too dark anyway, because it dries much lighter, so with this technique you very often ruin perfectly successful pictures. Therefore, the much smarter method is to let the paint dry completely.
Admittedly, this will need patience, and patience belongs on the endangered species list.
Once the paint is dry, you need a wet synthetic brush. If you rub a synthetic brush over the dried pigments, you will create a static charge.
The pigments detach almost completely from the paper.
It is best to absorb the pigments with a soft cotton cloth. this looks like this:

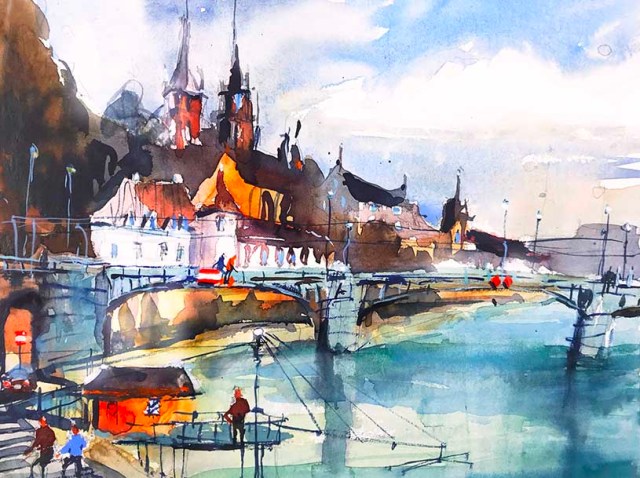
The 3 left houses are not not painted but washed out. This gives a kind of shabby chic. Perfect for old houses.
It is different to paper which is never touched by pigments, which look loke these roof tops in the swiss mountains.

Nothing is easier than removing watercolor paint. Nevertheless, a few tips for proper handling.
Flat brushes with a sharp edge are best for precisely removing paint from existing glazes.
Strong rubbing is strictly forbidden.
This will push the pigments deep into the paper. Rubbing also damages the surface of the paper, and afterwards the color application will always look different from other areas.
Summary: All you need is a synthetic brush, a rag and some patience. With this you can correct any watercolor!
The attitude of mind to this technique is very important, because many use it only to correct mistakes.
But if you master it, you can paint pictures quite playfully.
Whatever you do, you can change it again. This makes life easy! It fundamentally changes the design of images.
At all washing out look very soft, like light in the morning or night..


Problems with water: blossoms and back runs.
A back run starts when a brush loaded with water touches a paper which is damp.
Problem:
You may often have problems with water blossoms in your sketches.
These water spots always occur when your brush is wetter than the paint on the paper.
When the color is damp, the pigments are not settled into the fibers of the paper! the pigments are picked up by the water and they run with it.
Solution:
If you work quickly you won’t have any problems with water spots at all, because they don’t even occur when you put wet paint on top of another wet paint.
The water stain is created because the water pushes the pigments in front of it, like a big wave grabbing the boats on the ocean. If everything is wet, the process of settling down is not disturbed!
If you are painting slowly, your paint will dry.
Every time you dip the brush with its entire body into the water, it will load with water.
If this soaking wet brush hits your painting, then it will leave a big flower because of the pigments back run.
A brush should never be wetter than the paint.
Solution:
Every time you clean your brush, you knock the brush out so that excess water splashes out.
Of course, this does not work everywhere, so you always need a cotton cloth to dry the brush.
Summary:
Work fast or controlled! Both will help you avoid the water blossoms. The paint may be worked as long as it wet and not damp. After that, you need to take a break.
Patience and waiting are the hardest part of this technique.
If you need more time for a nice application of the pigments, you can resort to some tricks.
Watercolorists always work on cotton paper. The paper behaves like a sponge. Cotton paper absorbs a lot of water, so the surface always remains moist.
If you want to make color applications that are nice and even, and completely without these water blossoms, then this paper is of course perfect.
For urban sketchers, however, cotton paper is not necessarily the best choice. It depends on the climatic conditions of your country, of course. In our country it is always relatively cold, so paper dries very slowly.Other countries, however, the humidity can be very high. In all these cases, cotton paper makes painting slow. Joy and sorrow, on the one hand the paper makes wonderfully even paint applications, on the other hand it drives you crazy because it does not dry.
But there is a second solution, you work with a dry brush in the wet paint. The pigments from the dry brush will vary the color nicely without water bloom.
And now it becomes clear: Perfect watercoloring means controlling water!
In fact, you often create great effects by turning off the faucet.
Brush techniques – Mastering the dry brush!

Dry brush a speedy technique perfect for urban sketching!
When the sun is shining then you have reflection everywhere. Especially on water you have white spots all the time, because the light reflects so brightly that you can no longer see any color.
You can paint these reflections very easily and in seconds.

Solution:
Dry brush technique, the first step is to dry the brush, because the whole brush technique is useless if the brush is soaking wet.
There are two methods to do this, either dry the brush with a cloth or you can quickly shake the water out of the brush.
But this is usually not enough, the brushes store water wonderfully.
A brush transports the water from its belly to the tip.
It is important to stop the flow of water in the brush. To do this, bend the brush and use the side of the brush.
Watercoloring involves not only applying water, but also limiting the water. The brush can´t release water anymore.
I will show this brush technique in the workshop.
Test the brush ! Is it now dry enough?
Only when the amount of water in the brush is perfect, you use this brush technique in your painting.
Then you see the brush at high speed over the paper. The brush is no longer able to put enough color on the paper and the stroke breaks.
You have to practice this brush technique a bit!
But once you have practiced this technique, you will become the queen of the watercolorists.
Summary:
This technique is like riding a bicycle or motorcycle, if you are too slow you will fall!
If you are fast enough, everything becomes easy.
If you are fast the stroke breaks, have a look at the tree:

Tine Klein Aquarelle, Aquarell Watercolor, Basel, Kaserne, malen lernen, uskbasel2022
Fine and elegant lines.
Albert Einstein said:
“It’s easier to solve problems than to live with troublemakers all the time.“
And I agree ! There are always very simple solutions to the most complicated problems.
Line drawing is so complicated:

because we work with water and water just doesn’t keep its shape. For this to succeed, you need a lot of experience and must always have the right paint consistency. These lines are made with a high speed dry brus in a very small size.
It is so complicated; everyone tries it and fails.
I wonder why?
Because there are much simpler brush techniques for drawing lines.

The use of different techniques gives the opportunity to bring motifs very quickly and spontaneously on the paper. In this spontaneous sketch you can see 3 unusual ways to make lines.
– Above left in the skyscraper the lines were made with a wax crayon, then you only need to go over it with a thick brush. The structure of the house arises itself.
– Below left, the small street cafe was not painted in a complicated way. Tables and chairs were scratched into the wet paint. The people in the background are simply washed out. In this way, you can show something without putting a lot of time into it.
This technique is particularly suitable for creating inconspicuous background motifs.
Scratching lines:
The simplest of all is scratching. You see the line with a hard object into the wet paint.
you don´t need expensive Material just use:
- your fingernail
- the nib of your fountain pen .
- Or the other pointed wood of your brush.
- Also wonderfully suitable are edges of credit cards
This brush technique is much easier, the paper just needs to be wet enough so you can make a groove in the paper. This groove will fill with pigment. And so, you can easily draw wonderful lines in the wet paper without a pen. The scratched line will always be darker than the color and it will always match colors. Look at the house!
The advantage is that the line color always matches the background absolutely exactly.
This technique is really good for urban sketching, because it’s quick, easy and you don’t need any material.
The big drawback to this technique is that once you draw lines, you can’t remove them. The groove in the paper will always fill with pigment.
Stamping lines!
In watercolor running lines very easily!
But there is smart solution to avoid this problem.
Paint no longer runs when its consistency is very thick.
Unfortunately, you can not paint lines with it, the paint is too thick, the brush can no longer work here.
Nevertheless, you can use the brush. You can stamp lines with a flat brush. The whole thing also works wonderfully with all hard objects.
Therefore, many painters have an old credit card and use it instead of a brush.
Stamping is a smart solution!

In this little sketch I used a flat brush like a stamp.
Have a look at the crane it is made with the edge of a credit card.
Lifting Lines!
Dark lines are so easy to make! But what about light lines?
It’s super easy to lift out light lines from watercolors, too. There are a whole range of techniques for this.
The easiest, but hardest method to learn is how to scratch out damp paint.
Unfortunately, you have to catch the exact moment when the applied paint is almost dry.
When the paint has the consistency of honey then it is easy to lift!
At this moment you can easily scratch it out of the picture. And in the process make very fine, and elegant lines.
Germans would say:
Without sweat no Win!
That means you have to practice this technique for a really long time.
But if you master it! You will be a hero of watercolor!
There is a second and much easier technique. You need a very fine brush. You just paint the lines with clear water on top of the dry glaze. Then you can wipe off the color of the glaze.
The point of this technique is that you can subsequently work out thick and thin lines from already dry paint.
But very fine lines will remain a problem for beginners with this technique. Because the resulting lines will always be a little thicker than intended due to the running of the water.
The game is the way to success!
Those who use brush techniques playfully have great advantages.
If you use the brush playfully, you will find more and more solutions that will later help you to paint great pictures.
This makes your pictures playful and unique!
Every mistake you make is not a problem, but an invitation to learn something.
Open your eyes to all the solutions!
A brush is not a tool for only one working technique.
You can use not only wet brushes, but also dry ones. You can apply paint, remove paint, or wipe it out.
In every brush technique that solves a problem, there is usually a clever use of moisture.
That’s why you should always pay attention to it:
How wet is the paint and how wet is the brush?
If you always keep this question in mind, then you are on the way to becoming a master.
I hope you enjoyed the workshop, best regards from Switzerland.
Tine Klein

An article about the dry brush, use the translate Button it is written in German Language:
Der trockene Strich
https://blog.herz-der-kunst.ch/der-trockene-strich/
https://en.wikipedia.org/wiki/Drybrush
Art makes people happy. But many people, do not have the money to afford quality art lessons. For these people, I have been writing free art lessons for many years on a voluntary basis and without economic interest.
If you are economically well, then you are welcome to donate a little bit.
Because even a non-commercial blog needs some money to run.


